Last week I finally started finishing up the kitchen! Yay!!
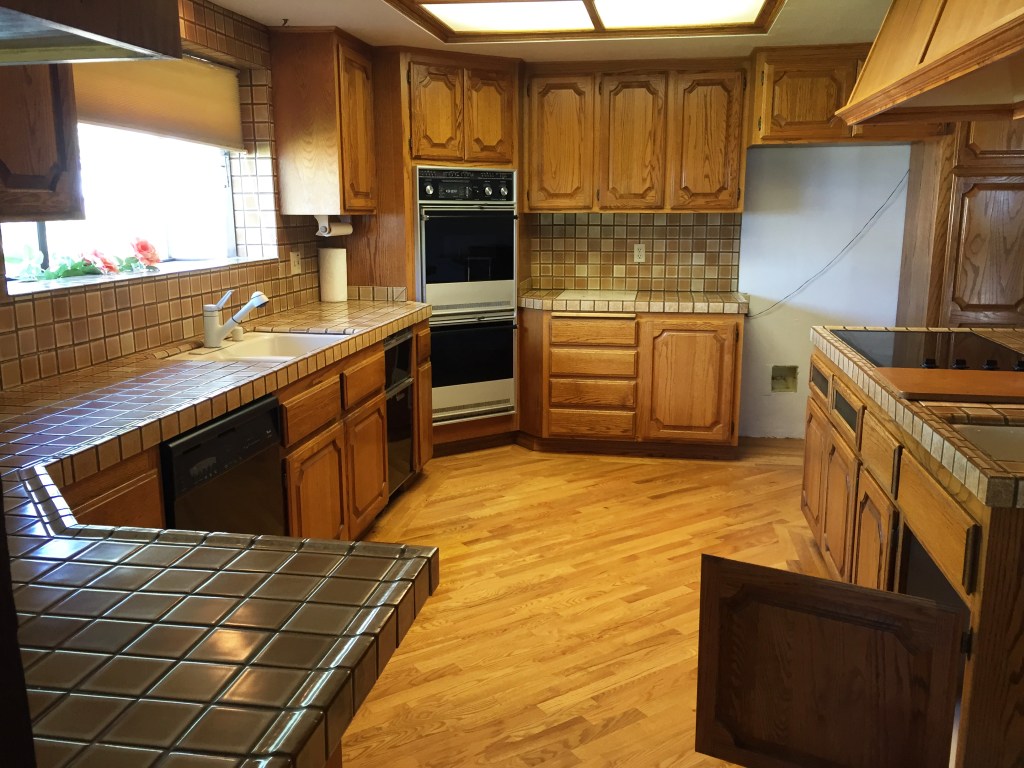
First up, the tiled backsplash. Ok, seriously you guys, can you believe that photo was what my kitchen used to look like!? I had to use it because it’s amazing!
I’ve had what my younger sister refers to as “prison walls”, in the kitchen for over a year. They really look terrible and always give me the feeling our house will never be done. The old drywall is patched and filled and torn. It’s terrible looking.
Anyway, this was my first complete tile job. I’ve set tile before but ended up tearing it out because I changed my mind. However, I realized my OCD was an asset in this type of job so that part I wasn’t too scared of. Every other part of this job had be a little nervous. I really just wanted it to look professional.

Ok, so this is what I’m working with. The big wood beam at the top is from when we had the drop down ceiling and I really didn’t want to pull it out. I’m going to work with it.

I was planning on just putting tile up on the drywall, because that’s how it had been done before. After talking to my brother who is a contractor in Vegas, I decided to do it the right way with a nice backer board prior to setting any tiles. I’m happy I decided to skip the “shortcut.” I made sure to mark where my studs are in the wall prior to putting anything up. I did this on the marble marking them with blue tape.

After cutting and fitting together the backer board, I put on the thin set. I was nervous about every part of this, even mixing the thin set stressed me out. I just did it. Sometimes you just have to DO IT!

Board is up! Joints all taped and filled. Perfect? Nope, but it’s up!

How sad is it when backer board becomes an actual improvement to your kitchen? I also drilled the required screws into the board, along with using the thin set. 
Setting the tile was my favorite part. I love puzzles and to me this was just as fun. Out of all the home improvements I’ve done on the house, this was my favorite. I would do tiling as a job.

I saved my cutting for last because I knew it would be more difficult and time consuming.

Then came the grouting. What the heck? How fun is that? It’s so satisfying and really made me happy that I didn’t use dark grout. One, for clean up and two, because I feel like my mistakes were less visible! Yay for that! This is the stage where I stopped being so scared and nervous. I finally started realizing that it was going to work out and I didn’t ruin the kitchen.

I tried to really make sure all of the little corners were filled with tile and grout and all my edges were sealed. I went over them all at the very end to make sure there were no open spaces. I think I’ll caulk the edge between the counter and bottom tile at some point soon. I also have to seal the grout at this point, but I’m pretty happy that it’s done and I’m one step closer to having a real kitchen!

I’ve kept the stud markers because of the wood feature I’m doing on the wall above the tile. Of course, I had to lay out my color inspiration for the kitchen!


I finished off the edge of the tile behind the fridge because knowing it’s back there and looks good even though you can’t see it makes me happy.

Knowing this section is completed makes me happy. PS I do have to change out my outlets and cover them with pretty ceramic covers.

This is how I finished the only other edge. It’s a nice tile piece that hid my beveled cut edges. This is what it looks like behind the fridge too. It’s a weird little corner space… This house has a lot of weird little corner spaces.

So, that’s it for the tile! This week I’m finishing up the wood feature above the tile, and some finishes to the cabinets. I’ll show you all that next week!
My secret for this job was to take my time. It took me days to get this done. I did one stage a day. I stopped before I was tired and several times I had to persuade myself to just pull a tile out that looked bad. I had to do things over that I would normally just leave. I followed the rules and followed through and it worked out for me. I had extra materials so I was able to redo anything that I didn’t like. I also cleaned everything up at the end of each work session so I wouldn’t feel overwhelmed.
The best part was having Alix come in each morning and hang out with me so I wasn’t bored, and she told me it was looking good every day. That matters.
Go do a project that scares you! I’m working on another one right now.


Leave a comment